When I was a kid growing up in Fresno, California, my mother would bring home whole pomegranates given to her by co-workers who grew them in the trees in their yards. Mom would cut the pomegranate in half for me, the only assistance I would receive, and I would sit on the lawn in the back yard with a paper napkin in my lap and pick out the red seeds one by one and pop them into my mouth. When I could no longer reach the seeds with my fingers, I'd gently peel back the skin and pry away the white membrane to reach even more seeds. It would generally take more than an hour to completely devour one whole pomegranate, single seed by single seed, and when I finished, my mouth and fingers would be stained bright red and my legs would speckled from the red juice. But not one seed escaped.
I don't think I've eaten a pomegranate since I was a teenager...a very, very, very long time ago.
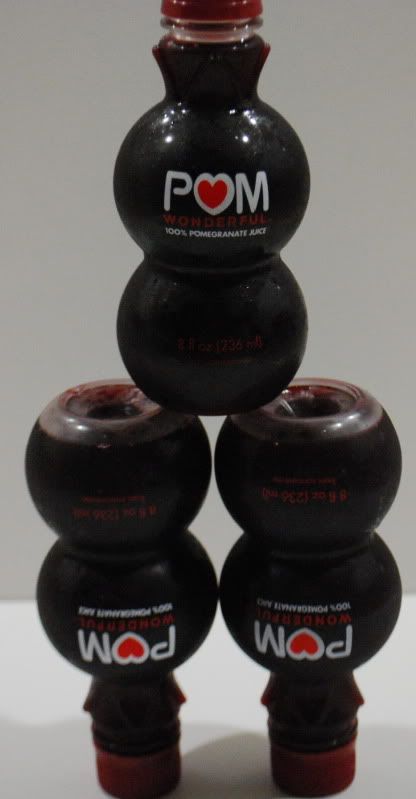
Just in the last couple of years, I discovered pomegranate juice was being sold in stores, first in the smaller bottles and now in quarts and I've been buying it regularly ever since. But, in the last couple of months, I noticed that many regular food bloggers were using pomegranate juice in everything and praising all things pomegranate because they had received free samples of pomegranate juice. WTH???
So I did it. I did what I sometimes do best. I whined. Publicly. I whined too much about all the other bloggers getting their free samples of POM Wonderful while I made my weekly trip to WalMart to purchase my POM Wonderful with my own money. I suppose POM Wonderful finally took pity on me and guess what I got ~ Yaaayyy!! Free POM Wonderful!
Now you know that I already used pomegranate juice (when I purchased it with my own money) in that barbecue sauce I made a while back. And, I use it in the that refreshing summer drink recipe I also shared in the same post. Of course, I also use it in a pomegranate martini. But what else? I have a box full of those bottles.
I have some ideas. Like reducing the juice down into a syrup and using it to flavor mascarpone cheese for a dessert. Or maybe using it to flavor a salad dressing. Or how about a citrus and pomegranate glaze for salmon. So, I'll be working on those recipes in the next few days to see if I can come up with something delicious to share.
In the meantime, thanks POM Wonderful and Molly for the delicious stash!
I hope this doesn't make me a shill.

Friday, July 31, 2009
POM Wonderful Pomegranate Juice

Monday, July 27, 2009
Our Foodie Weekend
Our food plans for the weekend were pretty ambitious.
Last week, I found two small packages of Maytag Blue Cheese at Kroger, so Friday night Tom made a delicious Grilled Fillet of Beef with Blue Cheese Glacage that he saw Chef Emeril Lagasse prepare several years ago on his program, Emeril Live!
I don't know why Chef Emeril would call it a "glacage" since it really isn't a glaze in the traditional sense of the word. It's more of a loose, savory custard. But, by any name, coming hot out of the oven, it smells absolutely wonderful.
Tom has prepared this dish many, many times and if you love blue cheese, you will love this. He almost always serves it over the Bacon and Sour Cream Mashed Potatoes and garnishes it with crumbled bacon and sliced green onions instead of the worcestershire sauce called for in the recipe.
It was the perfect meal to start a weekend.
Saturday we were up early and out the door by 7:15 am, heading for the North Little Rock Farmers Market for some nice eggplant and tomatoes. We scored more than that. We purchased two baskets of the season's first figs.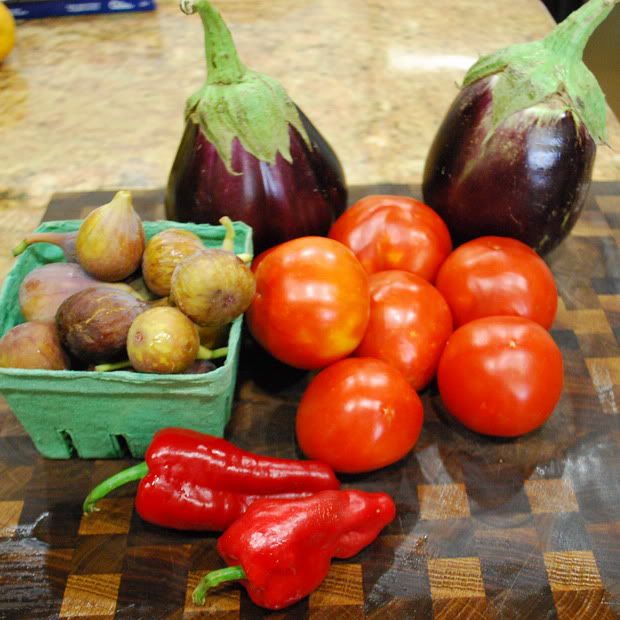
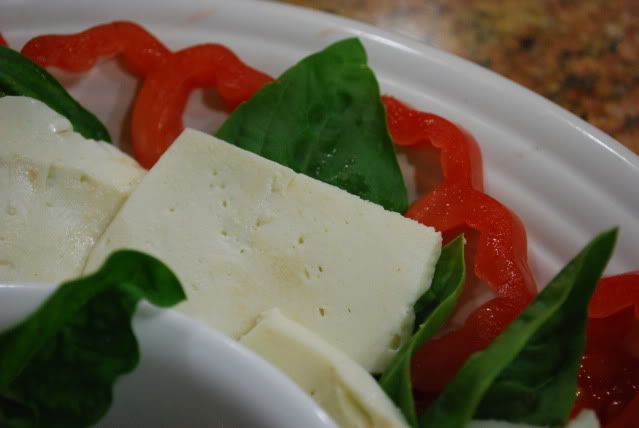
Those beautiful tomatoes would become an ingredient for an Insalata Caprese and the figs would be transformed into a Fig Galette for Sunday's dinner.
When we got home from the Farmers Market, we made a large batch of ricotta cheese to use for stuffing portobello mushrooms for dinner that night.
We mixed some of the fresh ricotta cheese with cooked sweet Italian turkey sausage, one beaten egg, some grated mozzarella and parmesan cheeses, some chopped fresh basil and a little Italian seasoned bread crumbs, then filled the large portobellos with the stuffing and cooked them on the grill outside. So creamy and luscious.
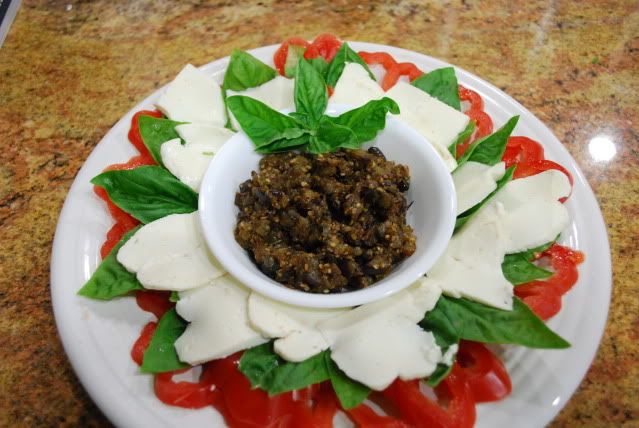
We also made large batch of mozzarella cheese for the Insalata Caprese to serve with our Sunday dinner, Brick Barbecued Chicken.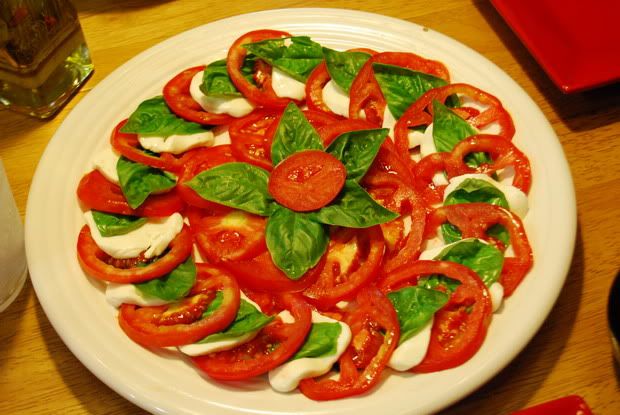
And, finally, I made the Fig Galette, also for Sunday's dinner.
A couple of weeks ago, I made my very first attempt at preparing a galette, sharing the painful experience here, but I vowed to try it again.
For the Fig Galette, I decided to avoid another crust fiasco and just use a prepared pie crust. It was one of the smartest decisions I've ever made.
First, I covered the bottom of a large baking pan (I used a round pizza pan) with parchment paper and laid one pre-made pie crust in the middle of the pan. I gently stretched the crust out a little with my fingers to make a little bigger circle. Then I sprinkled the crust with a couple of tablespoons of plain sugar. So far, so good.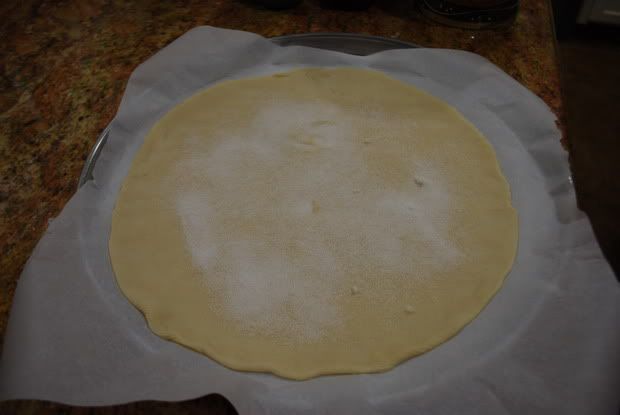
I trimmed the stems from the figs and cut them in quarters lengthwise. I laid the fig quarters in circles, overlapping each other slightly, until I had filled the crust but left a 1-1/2 to 2 inch border on the outer edge. For the center, Tom took one fig, cut off the stem and cut 6 slits lengthwise, making sure not to cut all the way through. He sat the fig upright in the center and gently opened it like a flower. He's so clever...
I sprinkled the figs with another 2 - 3 tablespoons of granulated sugar, then gently lifted the border edge of the crust over the figs (the parchment paper really helped control this), slightly pinching the crust together every so often so the border was even.
I brushed the edge of the crust with some beaten egg white and sprinkled the edge with turbinato sugar (just because I like the way turbinato sugar keeps it's shape during baking).
I then baked the galette in a 375° oven for about 45 minutes, or until the figs were bubbly and the crust was a golden brown.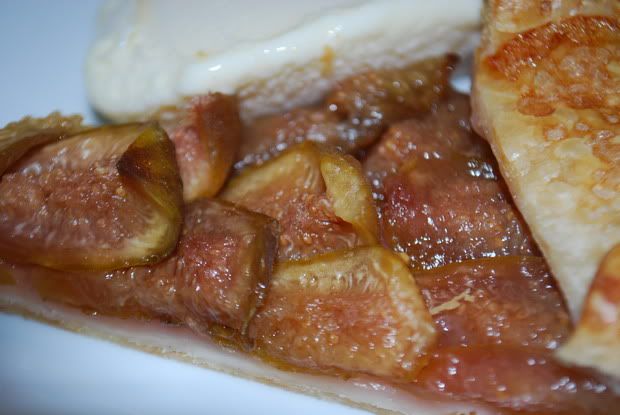
It turned out perfect!
Now that this galette was a success, I suppose I'll have to make another, but next time I'll have to make my own pastry crust.
Tuesday, July 21, 2009
My Two-Year Blogoversary!!
I can't even believe it. Two years. And unfortunately it comes at a time when my life is in personal turmoil and I don't even feel like writing.
But, let me just start by saying that I am grateful to all of you who have visited and left comments of praise, encouragement and friendship. Your kind words mean a lot to me. To those of you who visit and are too shy to leave comments, thank you for your repeated visits. I know you are there because I check my stats.
Even with my life in confused disorder, I have taken on one more challenge. Our local newspaper, The Log Cabin Democrat, has just changed it’s online format which provides an opportunity to be more interactive with it's readers. Several days ago, the publisher printed an editorial calling for community bloggers. I am proud to say that, after reviewing my blogs, the publisher has asked me to write a food blog for the online version of the newspaper!
I wrote three or four short blogs for the newspaper while it was still in the beta version, but I realized that this is going to take more time than I anticipated. I don't know how I am going to continue three blogs and at some point I may need to make a decision about which to continue and which to discontinue, but for now I'm not making any decisions.
Today, I don't have a recipe or photograph to share. I don't have any cute quips or stories or jokes to tell. To all of you, I just want to say thank you.
Monday, July 13, 2009
The Mozzarella Masterpiece!!
When I read Karen's blog about how easy it was to make Homemade Ricotta Cheese, I tried it and it was a success! The cheese was smooth, creamy and the perfect consistency with none of that kind of "grainy" feel or texture that I sometimes find in the store bought versions.
My first cheese making success gave me the confidence I needed to try others. So, once again I went searching and came across this site, which touts "30 Minute Mozzarella!" Ricki Carroll's instructions, just like Karen's, made it sound easy enough, so I ordered the starter kit.
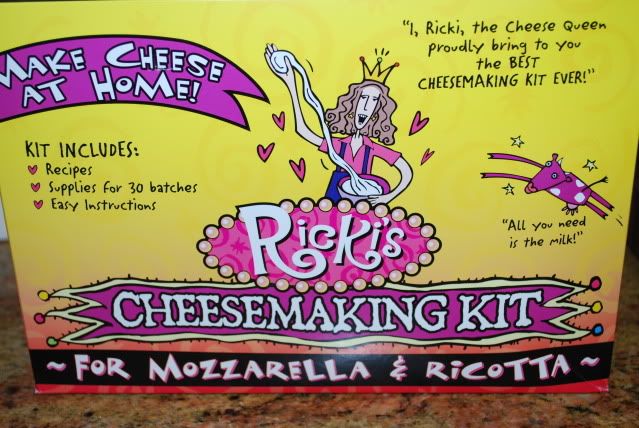
Click on the photo to order your kit!
Yesterday, Tom and I made mozzarella cheese!!
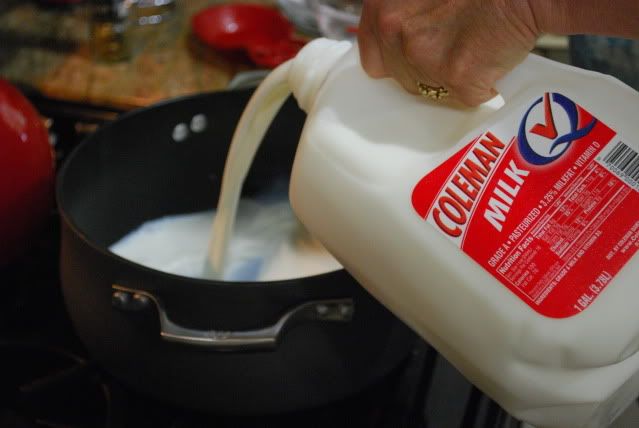
Add the citric acid solution. Bring it up to temp, then add the dissolved rennet. Yep, easy enough...
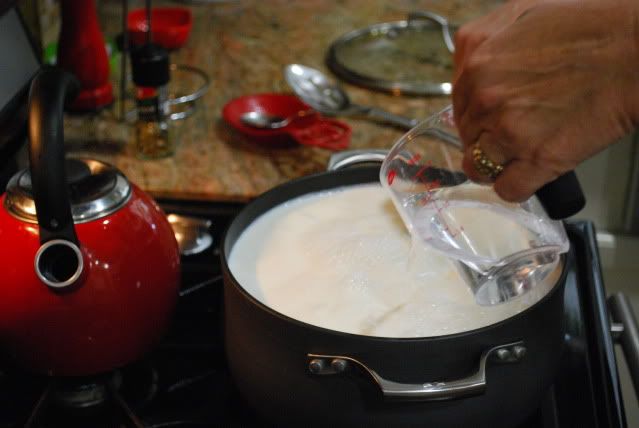
Cover and wait for about 5 minutes.(I'm good at waiting). Now, check the curd. (Uh oh, It's not exactly like the photo in the instructions, but I'll try to be patient)...
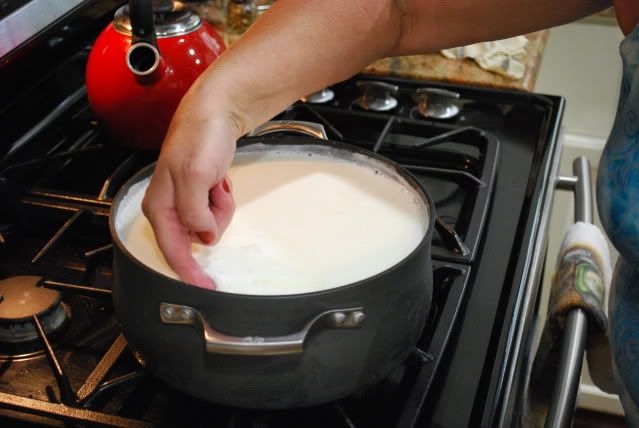
Cutting the curd with the knife...check
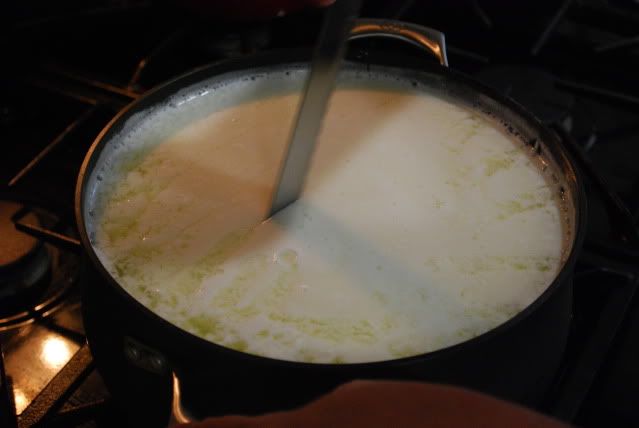
Stirring slowly (I don't think it's supposed to look like this)...

When I finished the slow stir, I removed the curds to a microwavable bowl(I was using the microwave method for heating the curd). After a minute in the microwave, I took out the bowl of curds and added the salt, then back in the microwave for 30 more seconds.
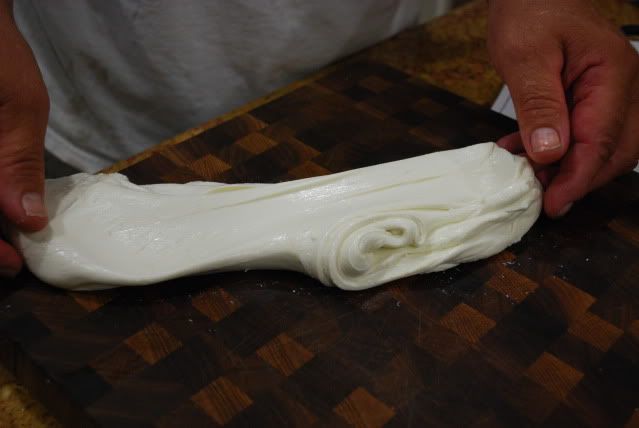
More stretching until it was smooth and shiny (Oh my Gawd, it's really turning into cheese!!!)...
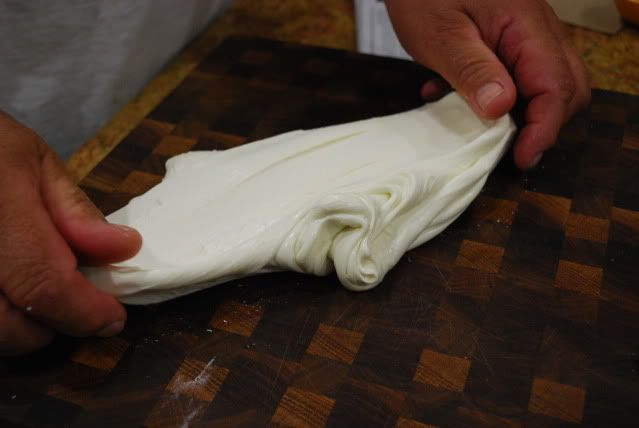
IT'S CHEESE !!!
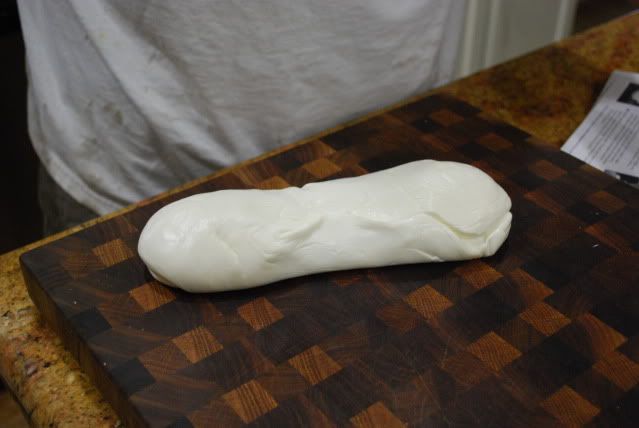
Now for the water bath...

And what do you think we had for dinner? Well, fresh homemade mozzarella cheese, of course...and some beautiful heirloom tomatoes...and fresh basil from my herb garden, then drizzled with just a little olive oil and white balsamic vinegar. In the middle of the plate is just a little Eggplant Tapenade (1 small eggplant, diced; 1/4 cup onion, finely chopped; 3 cloves garlic, finely minced; 1 heaping tablespoon of capers, chopped; 2 anchovy fillets, chopped; all cooked together in a little olive oil and adding at the end a little salt, a little pepper and a splash of balsamic vinegar), all of which was simply perfect with some sliced french bread, brushed with olive oil and toasted in the oven.
It was so unbelievably tasty that I may never buy mozzarella again.
Friday, July 10, 2009
Mixed Berry Galette - A Dismal Failure That Actually Tastes Good

I am not a baker. I know. I am repeating myself, but I must in order defend how horribly this turned out...sort of.
It looks terrible, very unappetizing. It looks like a four-year-old put it together. Maybe that's where my baking skill set level is ~ pre-kindergarten. I'd like to think I'm more accomplished than that, but the results don't support it. Except for the taste. It is surprisingly good. Good enough to make me want to try again.
What went wrong? Oh, let me count down the mistakes for you.
- First, I chose to make something I'd never done before. It sounds ridiculous to say that, but it's true. I'd never made a galette and when I saw Pam's recipe @ For The Love of Cooking, it looked simple enough. She made it sound simple, too.
- The dough ~ the start of the fiasco. I followed the recipe exactly. Honest. I didn't waver one smidgen. I rolled the dough into a ball, covered it with plastic wrap, put it in the refrigerator and set the time for one hour. After the full hour, I removed the dough from the fridge, unwrapped it and laid it down on my countertop that I had dusted generously with flour. When I started to roll out the dough into the 11-inch round circle, it just kept cracking and wouldn't hold together. Little did I know that you are supposed to let it come to room temperature so it's more pliable. Duh!
- The dough ~ part deux. The dough started sticking to the granite and I thought maybe I should try to get it to the pizza pan and finish rolling out there. But, I couldn't get the dough off the counter without ripping it to shreds, which I did after throwing a fit, and I wound up just throwing (yes, throwing) the dough onto the pizza pan in globs and pieces. I tried to roll the dough back together with my rolling pin, which, of course, would not work because the sides of the pan kept the rolling pin from barely touching the dough. I decided to just use my hands to gently manipulate the dough into what could only remotely resemble a circle.
- Then there was the filling and where my stupidity kicked into high gear. The recipe says, "Spoon the berries into the center of the pastry, leaving a 1 1/2 inch border." Since the recipe didn't specifically say "drain your berries," I didn't and got this...
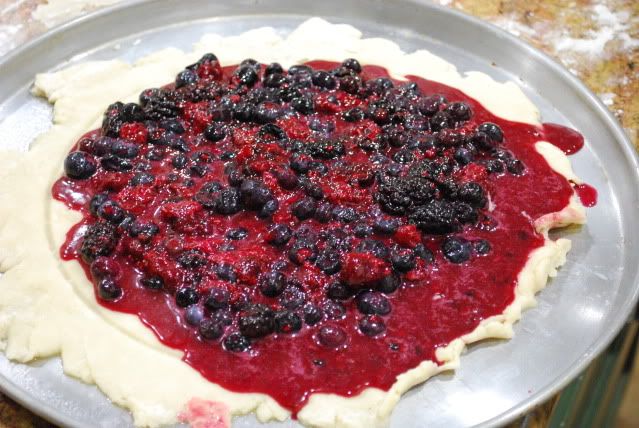
...at which point I was nearly in tears and ready to throw the whole thing into the trash. Tom, bless his even tempered heart, stepped in to help clean up the juice that had spilled onto the pan and quickly fold up the sides of the pastry to try to minimize the damage. Even so, when it came out of the oven, it was not pretty.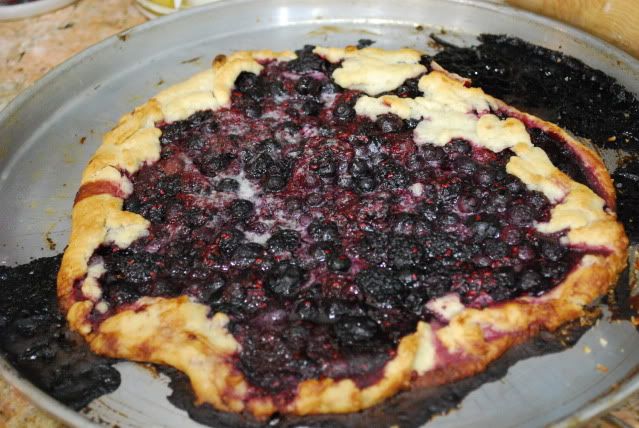
The galette was cemented to the pan. I couldn't even get a spatula underneath it. I gave up and decided it was time to take a break and left the kitchen.
A few minutes later, when I returned to the kitchen, the galette was no longer sitting in the middle of the pizza pan surrounded by burnt berry juice and sugar. Tom had removed the galette, intact, to a nice white serving plate and put the pizza pan in the sink out of sight. At that point, the pastry started to look somewhat appetizing. Imagine that. The moral: Presentation is just about everything.
And, it really does taste good. So, here's the recipe. By the way, I WILL try this again.
Adapted from For The Love of Cooking
Pastry Dough:
1 cup of flour
2 tbsp white sugar
1/2 tsp salt
1 stick of butter
3 tbsp of ice cold water
Place the flour, sugar, and salt in the bowl of a food processor fitted with a steel blade. Pulse a few times to combine. Add the butter and toss quickly (and carefully!) with your fingers to coat each cube of butter with the flour. Pulse 12 to 15 times, or until the butter is the size of peas. With the motor running, add the ice water all at once through the feed tube. Keep hitting the pulse button to combine, but stop the machine just before the dough comes together. Turn the dough out onto a well-floured board, roll it into a ball. Wrap the disks in plastic and refrigerate for at least 1 hour.
Filling:
2 1/2 cups of frozen mixed berries and cherries
1/2 cup white sugar (more if the fruit is extra tart)
1 tbsp flour
Water
Raw sugar crystals
2 tbsp butter
Mix the berries with the sugar and flour then cover and set aside for a couple of hours so they thaw.
Preheat the oven to 425 degrees. Remove the pastry dough from the refrigerator and roll into an 11 inch circle on a floured surface. Place on baking sheet. Spoon the berries into the center of the pastry, leaving a 1 1/2 inch border. Carefully fold the border of the pastry over the fruit, pleating it to make an edge. Brush water on the exposed pastry and add a bit of raw sugar crystals (I skipped this part because I just wanted to get it in the oven.). Top the fruit with a couple of pats of butter. Bake the galette for 25 minutes or until golden brown. Remove from the oven and let rest for a few minutes.
Pam served her galette with whipped cream. I had a little low-fat ice cream with mine. I think I'll have it again tonight, too.
Wednesday, July 8, 2009
Window Wednesday and a Simple Tuna in Lemon Broddetto with Pea Puree
There's a lot going on in my kitchen...
but, there's not much going on in my yard. It's surviving, but just barely. I think I even caught one of my goldfish panting, if that's possible.
The soaker hoses and compost have been laid in the garden and around the roses...
.JPG)
We have a small pile of compost left and Tom is building a compost bin to contain it (photos next week). When it's finished, I will begin to add kitchen scraps and yard waste to replenish it and use it later in the summer.
We continue to have a few grape and roma tomatoes, but nothing to write home about.
.JPG)
And my heirloom tomato teases me with what looks like emerging blossoms, but...nothing yet.
.JPG)
Those nasty little leaf bugs make my poor sweet potato vine look like it's been hit with shotgun pellets...
.JPG)
but I don't feel so bad after a visit to the Memphis Zoo over the weekend. Their sweet potato vines look just like mine. But, I still refuse to use poison.
Sadly, as you can see, my yard is not flourishing, but I still have ample herbs for cooking. I may just have to visit the Farmer's Market here in Conway. It's open Tuesday, Thursday and Saturday. I suppose a trip there tomorrow morning for fresh vegetables might be a good idea.
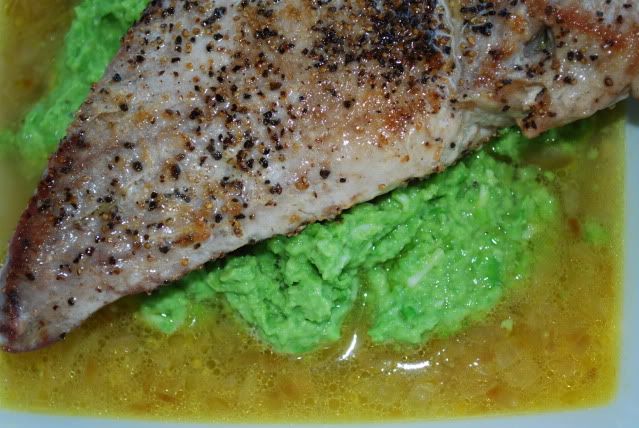
Last week, as I was prepping for the weekend in Memphis, I was watching Food Network off and on (mainly to avoid the entire All-Michael-Jackson-All-The-Time thing that permeated every other channel) and I happened to catch an episode of Everyday Italian. This time Giada DeLaurentis was preparing a salmon dish with a lemon broth and pea puree. It looked really beautiful, light, tasty and easy to make so I thought I'd give it a whirl.
I didn't have salmon in the freezer, but I did have some nice Ahi Tuna I bought at Sam's Club a couple of weeks ago and froze for just such an occasion. And, lucky me, I found a bag of peas in the freezer as well.
I cut Giada's recipe in half because I was just preparing the dish for the two of us, but it still made two very large, satisfying servings. I followed the recipe except that I substituted the salmon with tuna and left out the mint altogether (you may remember I ripped out my skanky looking mint plant weeks ago). But, since I don't really care for much for the flavor of mint anyway, I didn't miss it. I personally don't think the dish suffered. It was delicious and fresh tasting, and I can't wait to make it again.
What follows is the recipe as I prepared it, but you can get Giada's original recipe here.
Adapted from Giada DeLaurentis' recipe @ Everyday Italian
Lemon Brodetto
1 tablespoon olive oil
1 shallot, finely diced
1 lemon, juiced
1/2 lemon, zested
1 cup chicken broth
Pea Puree
2 cups frozen peas, thawed
1 clove garlic, roughly chopped
1/2 teaspoon kosher salt
1/2 teaspoon fresh ground pepper
1/2 cup extra-virgin olive oil
1/2 cup grated parmesan cheese
Ahi Tuna
1/8 cup olive oil
2 pieces (4 to 6 ounces each) ahi tuna
Kosher salt
Fresh ground pepper
To Make Lemon Brodetto: Warm the olive oil in a small saucepan over medium heat. Add the shallots and saute until tender and translucent. Add the lemon juice, lemon zest and broth. Bring to a simmer and keep warm, covered, over low heat.
To Make the Pea Puree: Combine the thawed peas, garlic, salt and pepper in a food processor and puree. With the machine running, add the olive oil in a steady drizzle. Transfer the pea puree to a small bowl and stir in the Parmesan. Set aside.
To Make the Tuna: Warm the olive oil in a large, heavy skillet over high heat. Season the tuna with salt and pepper. Sear the tuna until a slight golden crust forms on the first side, about 4 to 5 minutes. Flip the fish and continue cooking until medium-rare, about 2 minutes more depending on the thickness of the fish.
To Assemble: Divide the Lemon Brodetto between 2 dishes.
.JPG)
Place a large spoonful of Pea Puree into the center of each bowl.
.JPG)
Place the tuna piece on top of each mound of Pea Puree.
.JPG)
Serve immediately.
Debbie @ The Friday Friends is on vacation, but check out her blog for what's outside her kitchen window.
Karen @ Karen Cooks may also be on vacation, but do take a look at her beautiful peonies outside her kitchen window. I covet them.
Wednesday, July 1, 2009
Window Wednesday, Blackberry Cobbler & A Little Teaser
June in Arkansas has been unseasonably hot. My plants are suffering and when we returned early from our vacation, we had some serious casualties.
My squash plants did not survive...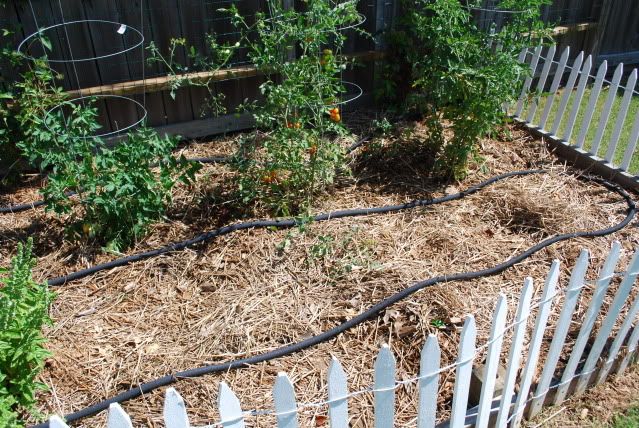
Maybe in the fall I'll plant something else in their place. Right now it is too hot to plant anything.
I had to rip out what was left of my 2 year old thyme and my oregano is looking at me with soulful eyes, pleading with me to save it. It's just pitiful...
And, yesterday, I ripped out the nasturtium. It was just barely holding on...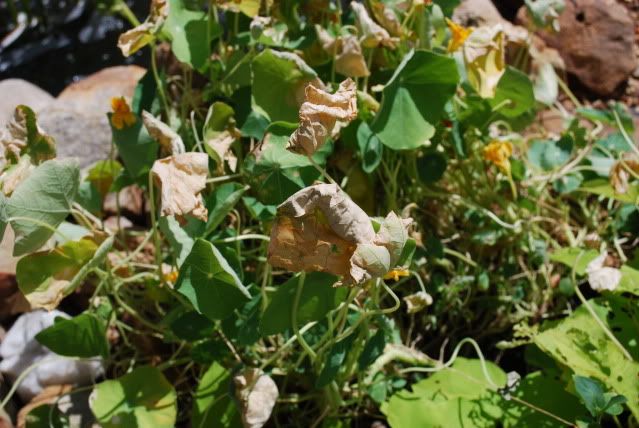
What's left? Chives, Italian parsley, basil and Texas tarragon are all doing well.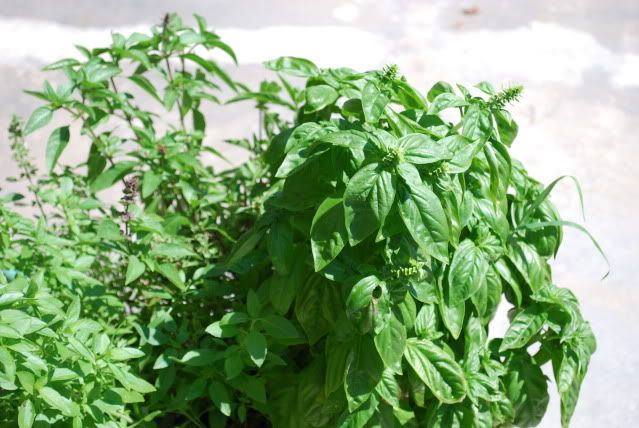
The rosemary is showing signs of distress, but surviving.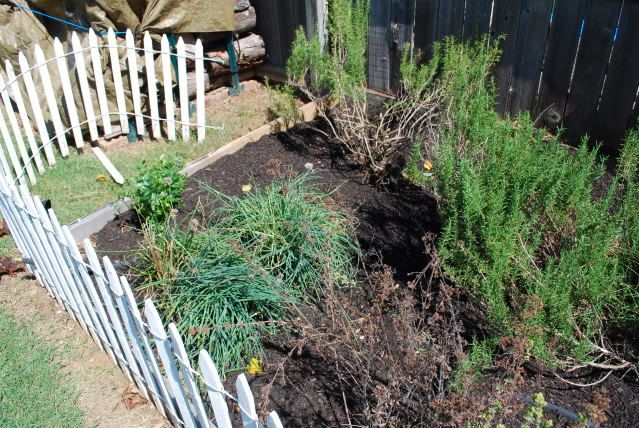
I've picked a few roma tomatoes and some of these grape tomatoes...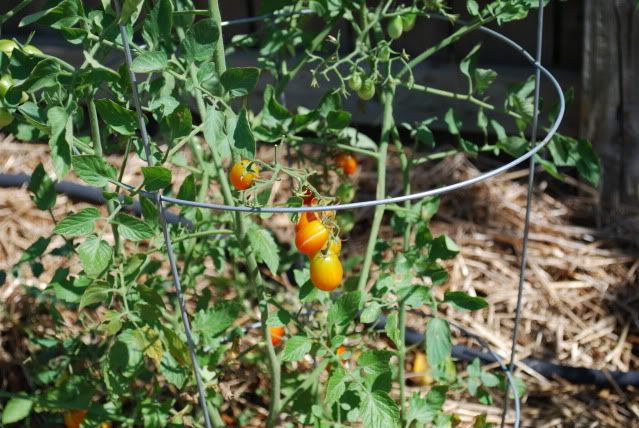
But my heirloom tomatoes refuse to blossom. I have no idea why, but we are taking some desperate measures. I decided to take the no-dig organic garden approach.
We bought 4 soaker hoses and 4 yards of compost and Tom has laid about 3 yards of the compost in the garden, around the blackberries and under the roses. We left last year's straw in the herb/vegetable garden and put the compost right on top of it. Every bed has at least 3 to 4 inches of compost on top and a soaker hose buried underneath it. The rest of the compost is in a pile in the back of the yard waiting to be fortified with more organic material that we add from the kitchen and the yard, and a couple of bags of rotted manure. I refuse to use chemicals!
Even the blackberries are showing signs of stress, some of it caused by some damage to the canes when a large branch of our neighbors tree broke off during a storm and fell over the fence onto blackberry plants. But, the intense early heat and lack of water hasn't helped either.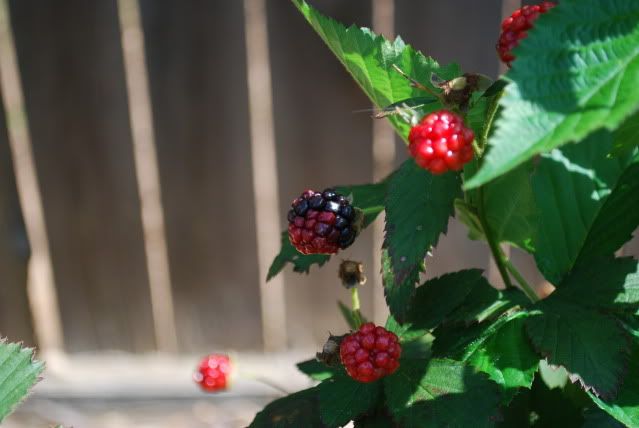
But, Tom was able to salvage enough to make a Blackberry Cobbler.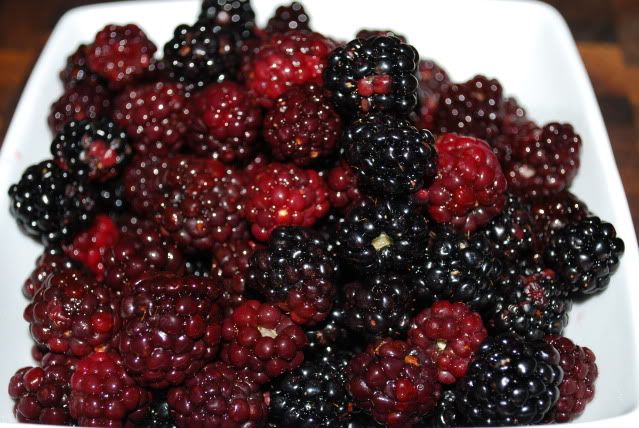
As you have probably guessed by now, I'm not really a baker. Sure, I make cookies, bars, an occasional cake (usually from a cake mix) and a pretty good apple pie, but I really don't bake like some of you out in the blogosphere. I'm getting more adventurous though and baked these sweet potato rolls for last Thanksgiving and made scones for the first time when I saw these.
Consequently, I don't have a cache of recipes for cobblers and, once again, had to go searching. I decided on a recipe from the Betty Crocker website. But, I can't help myself, I did tweak it a little bit. Although the original recipe called for only 2-1/2 cups of blackberries, I had 4 cups and wanted to use all of them, however I did not increase the amount of batter. Oh, yeah, and I also added lemon juice to the blackberries. Following is the recipe with my changes. If you'd like to see the original recipe, just click on the "Betty Crocker website" link above.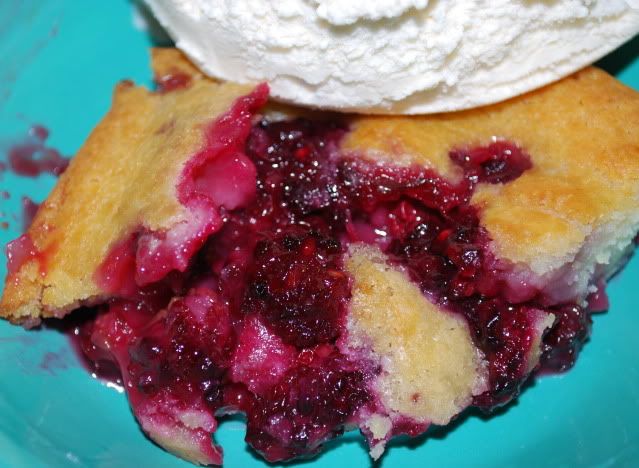
adapted from a recipe from BettyCrocker.com
4 cups fresh or frozen (thawed and drained) blackberries
1-1/2 cups sugar
juice of 1/2 lemon
1 cup all-purpose flour
2 teaspoons baking powder
1/2 teaspoon salt
1 cup milk
1/2 cup butter, melted
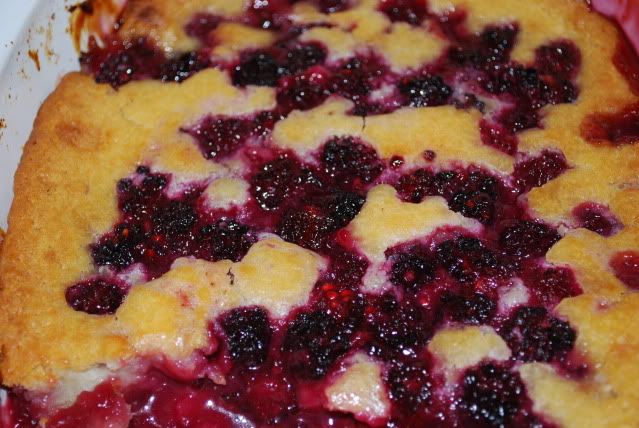
In a medium bowl, stir together blackberries, sugar and lemon juice. Let stand for about 20 minutes or until fruit syrup forms. Heat oven to 375°F.
In a large bowl, stir together flour, baking powder, salt and milk. Stir in melted butter until blended. Spread in ungreased 8-inch square pan. Spoon blackberry mixture over batter.
Bake 45 to 55 minutes or until dough rises and is golden. Serve with ice cream or cream.
And the Little Teaser? Well, I got so excited when I was able to make that wonderful ricotta cheese, I thought I'd try my hand at some others...
 | .JPG) |
Stay tuned!
Subscribe to:
Posts (Atom)